Warning: Constant DISALLOW_FILE_EDIT already defined in /home/i2upubu9ortw/public_html/wp-config.php on line 100 High Hydration Bread for Beginners, Part 1 - CausticWorks
Skip to content
Baking isn’t something I generally enjoy, as it presses all the worst buttons for me. While you follow a simple formula, the results can vary greatly — but it seems so simple! Bread is one of the best examples of this possibility for frustration, with high hydration bread being notoriously failure-inducing. Which, I guess, is why I do it anyway, and you should too!
It surprised me to realize that I’ve been baking bread for about 15 years now. I’ve been working from two books most of that time, and they have served me relatively well.
A bread bonanza – cinnamon raisin swirl, herbed swirl, and a cheddar jalapeno
One area where these two books are lacking is in explaining the benefits of different levels of hydration in the dough; that is, percentage of water (by weight) relative to to total weight of flour. I’ve mostly worked in the easy-to-manage 50-65% range as you can knead it in a pretty straightforward way without getting your hands covered in dough. However, the character of the dough and the final product changes enormously as you reach and exceed 75%, and it’s certainly worth learning the necessary techniques.
Thus, I present for your consideration my somewhat haphazard and unscientific assessment of the process of high hydration bread makery. There are certainly more experienced types out there who will note the many things I may be doing wrong, but most of those people are too busy baking bread to check in and correct me (even if there’s an overnight rise to wait through).
Crumb from a white loaf of sourdough, probably 60% hydration or so. Not bad for a sandwich.
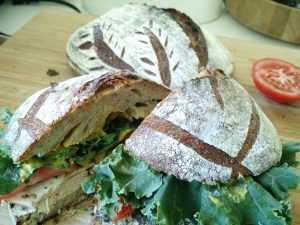
Crumb from my first high hydration (~75%) loaf. Pretty, tasty, great crumb (for a first try).
Research
I first caught wind of the differences when I saw decorated loaves on Instagram, through tags like #sourdough. This is pretty much a universal tag that could easily be replaced with #somehipsterdudemakinghighhydrationbread. Not that there’s anything wrong with that — hipsters everywhere are spending too much time making stuff and charging too much money for the finished product, but apparently there’s a market for it.
Anyway, perhaps only vaguely hipsterish users like @danlarn and @nikolaimeling had several posts that got me inspired, and in particular @danlarn‘s videos. I’m not certain I can link Instagram GIFs on here so just imagine a series of shorts showing each step of the process; clearly you should be able to do so already. Or better still, look some up on YouTube. I looked more closely at the process on sites like the perfect loaf, where descriptions of the steps and links to videos of masters at work (Chad of Tartine Bread) showed me the basics. I’m not generally one to follow recipes for the most part, but these sites helped point out what to look for and give guidance for cook and rest times.
Ultimately, this culminated in some good and bad attempts, but not for a lack of adequate information. It’s a learning process, and I think I’ve learned as much (if not more) from the mistakes as from the successes. Also, one of the benefits of bread: it’s almost always edible (as long as you don’t forget the salt).
Tools
There are really only two items that I’ve found critical for creating high hydration bread: a scale and a dutch oven.
The former makes it much easier to accurately weigh and compare percentages of mass rather than trying to do so using cups and teaspoons. It’s also helpful because two conventionally measured cups of flour can be a vastly different amount, depending on how compacted it is. Don’t worry, you don’t need anything super expensive, and you don’t have to be spot on all the time. The more accurate you can be hopefully aids in repeatability, but you can be off by quite a bit and it’ll still be edible. Of course, with that said I still work in grams because it provides a finer resolution and is much easier to compare (1kg = 1000g rather than 1lb = 16oz). So, get with the times and go metric.
As for a dutch oven, I happened to have the same one described on the perfect loaf, which is a Lodge 3.2Qt “Combo” cooker. The bonus is this works as a frying pan if you don’t have a cast iron frying pan yet. It’s slightly on the small side with a roughly 9″ inner diameter; many sites recommend a 4Qt or larger. However, I can get a good sized loaf in there, and I can make a couple loaves in a day without overwhelming my family and ending up with a lot of croutons. The reason I consider this critical is because of three things: it holds a lot of heat, helps even out the temperature variations in your oven, and keeps in moisture. All three of these things can be remedied in other ways (yes, you can spray water into your oven to simulate a professional oven), but this is certainly the easiest.
Ok, it’s actually three items, because I’d say that as soon as you get above about 80% you’re not really going to want to touch the dough with your hands. People seem to have success with wetting their hands, or dusting them with flour, or just outright drying them — well, I have no idea who these people are, but dough attaches to my hands pretty readily. I find that I can use a flexible plastic scraper effectively enough to ensure that I barely have to wash my hands. You may have better or worse luck, but a useful tip I picked up somewhere is to wash your hands in cold water. It really does come off faster, but also use a paper towel or something to help speed it up.
Beyond those two three items, I also have a few others I’ve acquired over the years that have proven useful:
Bannettons (rising baskets or brotforms): this 8.5″ oval and this 8.5″ round fit well in the combo cooker as long as you don’t overload them. This helps the dough rise while supported, so it doesn’t just grow outwards and end up flat (unless you want a pizza). Pretty key for high hydration loaves. Note that the round one I’ve linked to comes with a flexible scraper like I described above.
A regular razor blade works for scoring, or you can grab a “lame” if you’re fancy.
A pizza peel is a good idea for flipping the rested dough onto before loading it into the combo cooker, but you can do this on parchment paper if you like to get adventurous.
With that in mind, get some good oven mitts! Sorry, OveGlove doesn’t hold up well to 500ºF, so I’d suggest getting silicone jobbies and being quick about it. Welding gloves are also pretty great, but really I have yet to use anything where you can take your time, so get on with it already.
Mixing bowl. Yeah, maybe this should be in the “critical” section.